Available as/for:appimagedebian-packageosx-compatiblerelease-stablesuse-rpmwindows-binaryx86-64
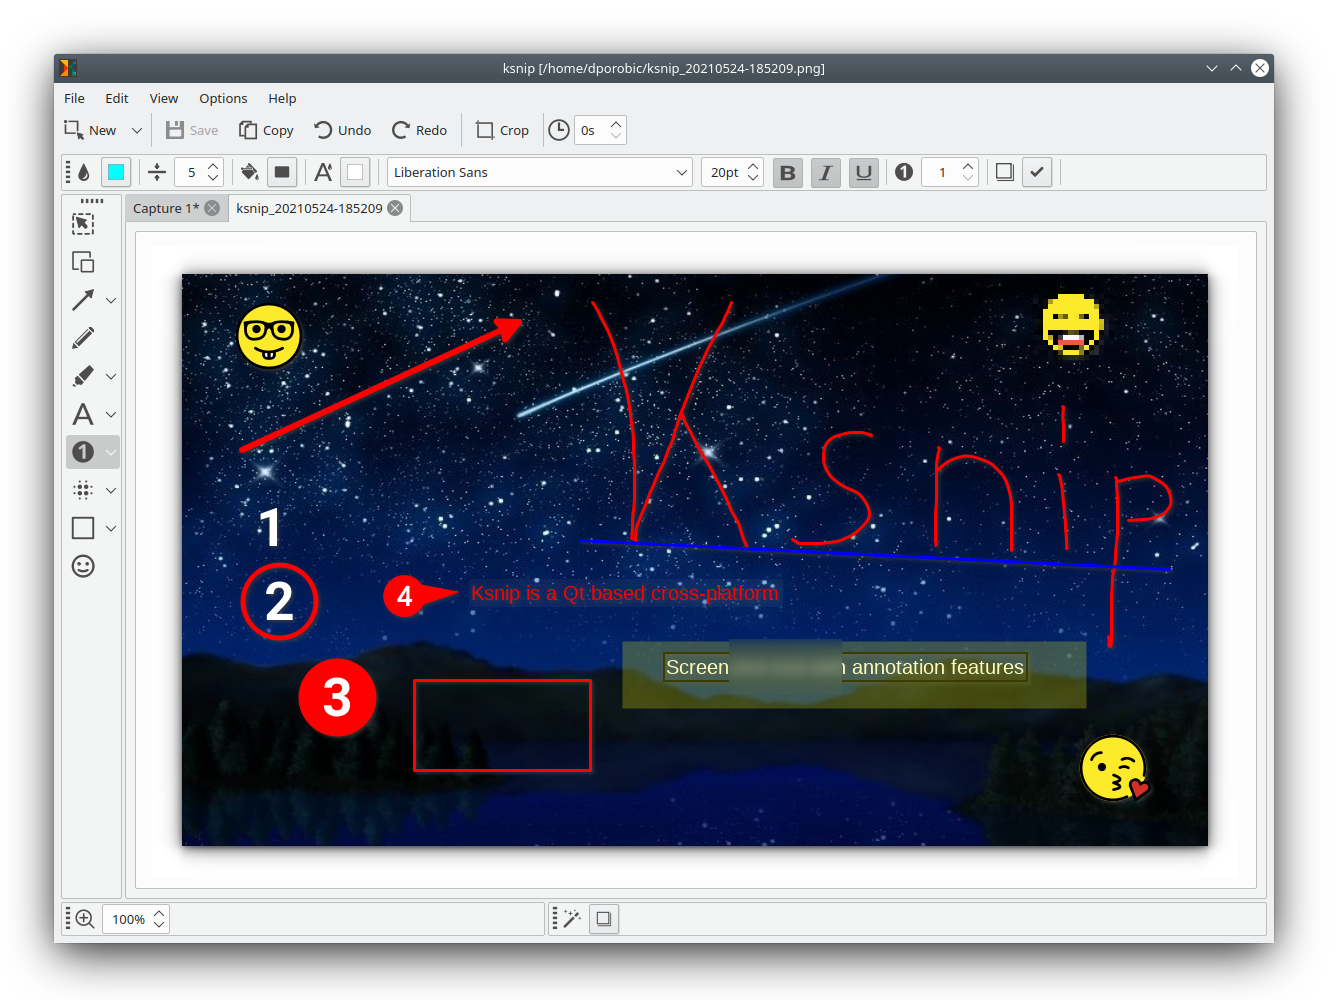
Description: Ksnip is a Qt based cross-platform screenshot tool that provides many annotation features for your screenshots.
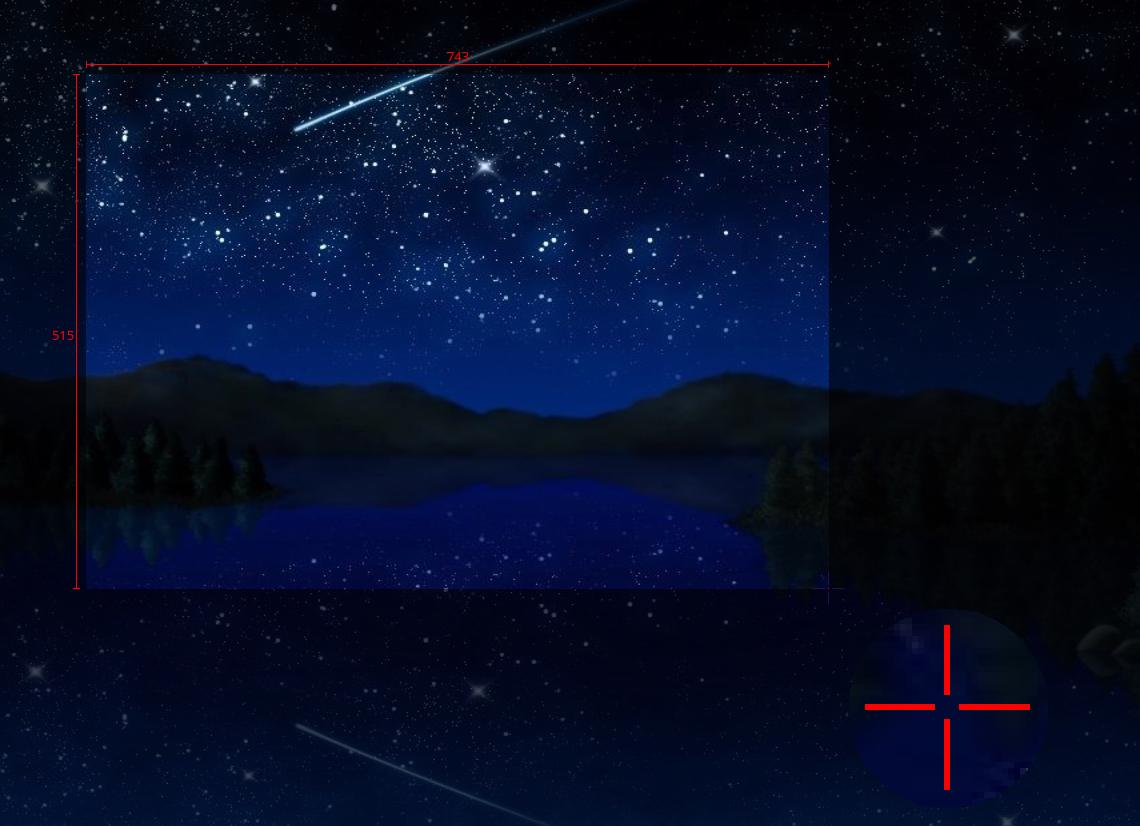
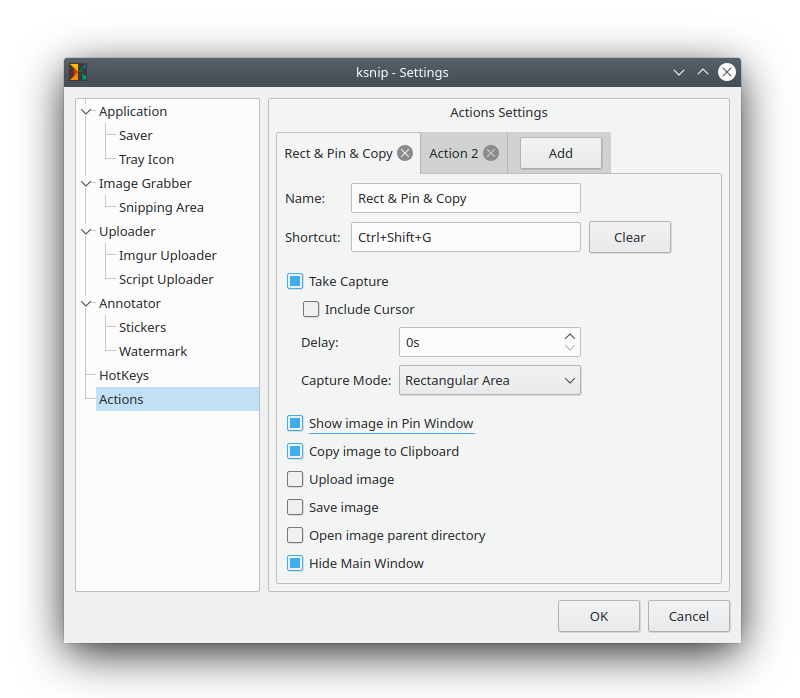
# Features Latest ksnip version contains following features: * Supports Linux (X11, Plasma Wayland, GNOME Wayland and xdg-desktop-portal Wayland), Windows and macOS. * Screenshot of a custom rectangular area that can be drawn with mouse cursor. * Screenshot of last selected rectangular area without selecting again. * Screenshot of the screen/monitor where the mouse cursor is currently located. * Screenshot of full-screen, including all screens/monitors. * Screenshot of window that currently has focus. * Screenshot of window under mouse cursor. * Screenshot with or without mouse cursor. * Capture mouse cursor as annotation item that can be moved and deleted. * Customizable capture delay for all capture options. * Upload screenshots directly to imgur.com in anonymous or user mode. * Upload screenshots via FTP in anonymous or user mode. * Upload screenshots via custom user defined scripts. * Command-line support, for capturing screenshots and saving to default location, filename and format. * Filename wildcards for Year ($Y), Month ($M), Day ($D), Time ($T) and Counter (multiple # characters for number with zero-leading padding). * Print screenshot or save it to PDF/PS. * Annotate screenshots with pen, marker, rectangles, ellipses, texts and other tools. * Annotate screenshots with stickers and add custom stickers. * Crop and cut out vertical/horizontal slices of images. * Obfuscate image regions with blur and pixelate. * Add effects to image (Drop Shadow, Grayscale, invert color or Border). * Add watermarks to captured images. * Global hotkeys for capturing screenshots (currently only for Windows and X11). * Tabs for screenshots and images. * Open existing images via dialog, drag-and-drop or paste from clipboard. * Run as single instance application (secondary instances send cli parameter to primary instance). * Pin screenshots in frameless windows that stay atop other windows. * User-defined actions for taking screenshot and post-processing. * OCR support through plugin (Window and Linux/Unix). * Many configuration options.
# Installing Binaries Binaries can be downloaded from the release page [here](https://github.com/ksnip/ksnip/releases). Currently we provide RPM, DEB and AppImage for Linux, zipped EXE for Windows and APP for MacOS in a DMG package.
# Continuous build We build and provide all supported binaries for every pushed commit, those can be found at the top of the release page. Continuous build artifacts are not fully tested and in most cases they are work in progress so use them with caution.
# AppImage (Linux) In order to use AppImages, make them executable and start using it, no installation required. $ chmod a+x ksnip*.AppImage $ ./ksnip*.AppImage
More information about setting to executable can be found here: https://discourse.appimage.org/t/how-to-make-an-appimage-executable/80.
# RPM (Linux) Just install them via rpm and start using. $ rpm -Uvh ksnip*.rpm $ ksnip
# DEB (Linux) Just install them via dpkg and start using. $ sudo dpkg -i ksnip*.deb $ ksnip
# Snap (Linux) The usual installation for snaps, will install latest version: $ sudo snap install ksnip
The continuous build version is also available as edge, in order to install it you need to provide the edge flag: $ sudo snap install ksnip --edge
# Flatpak (Linux) The usual method for Flatpaks will install the latest version: $ flatpak install flathub org.ksnip.ksnip
# EXE (Windows) The exe file with all required dependencies comes in a zipped package, which just need to be unzipped with your favorite zip tool. Ksnip can then be started by just double clicking ksnip.exe.
# APP (MacOS) The app file comes in a dmg package which needs to be opened and the ksnip.app file needs to be dragged and dropped into the Application folder. After that the application can be started by double clicking ksnip.app
# Dependencies (only required when building from source) ksnip depends on kImageAnnotator and kColoPicker which needs to be installed before building ksnip from source. Install instructions can be found on the github pages.
# Known Issues X11 1. Snipping Area with transparent background doesn't work when Compositor is disabled, freeze background is used in that case.
MacOs 1. Snipping Area with transparent background doesn't work, freeze background is always used. Issue https://github.com/ksnip/ksnip/issues/151 2. Second activation of snipping area doesn't get focus, you need to switch to the right side in order to see the snipping area. Issue https://github.com/ksnip/ksnip/issues/152 3. Mouse Cursor is always captured. Issue https://github.com/ksnip/ksnip/issues/153
# Bug report Please report any bugs or feature requests related to the annotation editor on the https://github.com/ksnip/kImageAnnotator/issues github page under the issue section. All other bugs or feature requests please report on the https://github.com/ksnip/ksnip/issues github page under the issue section.Last changelog:
V1.10.1
Fixed: DragAndDrop not working with snaps. (#89 Fixed: Loading image from stdin single instance client runner side doesn't work. (#741) Fixed kImageAnnotator: Fix for unnecessary scrollbars. (#303) Fixed kImageAnnotator: Add KDE support for scale factor. (#302) Fixed kImageAnnotator: Show tab tooltips on initial tabs. Fixed kImageAnnotator: Sticker resizing is broken when bounding rect flipped. (#306)
Great work,
It would be great if you detect "double-click" & the "num-pad enter" as a command to take the screenshot.
Also, can you add a magnifier effect to the image editor?
Keep it up
1010 the best
for someone like me that uses Solus 4.2 as my desktop on the repository I can't find ksnip for my presentations which is an essential tool that I work with and the only options I found as snap or flatpak and I hate both for many reasons!
You a life saver for me and I do appreciate for sharing this app, Thank you very much DAMIR
Hey Sonia,
the AppImage should be working too, not only the deb. Is there any error message? Coud you try to start the AppImage with:
QT_DEBUG_PLUGINS=1 ./ksnip-1.6.0-x86_64.AppImage ?
Maybe you're facing the same issue as this user https://github.com/ksnip/ksnip/issues/249
Hi! Is that possible to implement higher "Blur level"? Because it's only 20 max now, see what's happening, if the text is large: https://i.imgur.com/s5WSOGy.png
Hi there,
if you're building from source, you need to build and install those two:
https://github.com/DamirPorobic/kImageAnnotator
https://github.com/DamirPorobic/kColorPicker
Cheers,
Damir
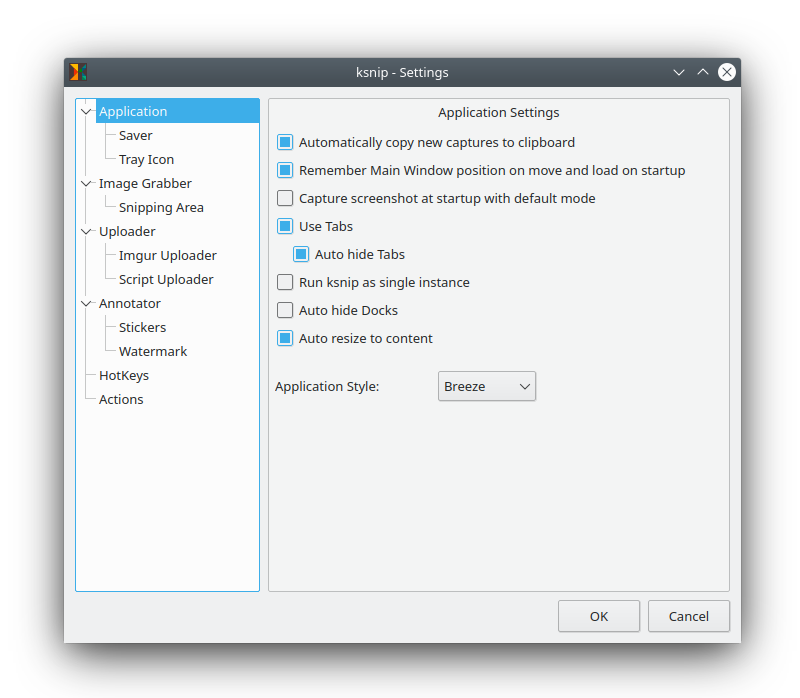
It uses the Qt Fusion Style by default because Fusion is available for all platforms (Winows, MacOS, Linux). If you're not a big fan of Fusion (like me), then you can switch the style under Options -> Settings -> Application -> Application Style.
You should see there all available Qt Styles on your machine.


 0.01 MB


Ratings & Comments
44 Comments
10 10 the best
8 8 great
Great work, It would be great if you detect "double-click" & the "num-pad enter" as a command to take the screenshot. Also, can you add a magnifier effect to the image editor? Keep it up
10 10 the best for someone like me that uses Solus 4.2 as my desktop on the repository I can't find ksnip for my presentations which is an essential tool that I work with and the only options I found as snap or flatpak and I hate both for many reasons! You a life saver for me and I do appreciate for sharing this app, Thank you very much DAMIR
10 Thanks for this new release!
9 9 excellent
9 9 excellent
Sucess compiling from source and running 1.7.1 -- Thanks!!
So far 1.7.0 works great. Thanks for this new release!
9 9 excellent
This version 1.6.0 Build 922-818b2e0 on my Bionicpup64 now works fantastic, thx Sonia
Thanks for the new release!
You're welcome :)
Hi Im Sonia I use Bionicpup64(Ubuntu bionic) your application dosn't start.
your last appimage applicatio 1.6
now I have tried 1.6 .deb and it seems that you work correctly, thanks and sorry sonia
Hey Sonia, the AppImage should be working too, not only the deb. Is there any error message? Coud you try to start the AppImage with: QT_DEBUG_PLUGINS=1 ./ksnip-1.6.0-x86_64.AppImage ? Maybe you're facing the same issue as this user https://github.com/ksnip/ksnip/issues/249
no, nothing error message: only do not start. OK, Ill try that.
Hi! Is that possible to implement higher "Blur level"? Because it's only 20 max now, see what's happening, if the text is large: https://i.imgur.com/s5WSOGy.png
Hi There, you can open a feature request under https://github.com/DamirPorobic/kImageAnnotator we will take a look at it.
Thank you! However I cannot build 1.5.0. CMake cannot find kImageAnnotator. See github issue: https://github.com/DamirPorobic/ksnip/issues/158
Hi there, if you're building from source, you need to build and install those two: https://github.com/DamirPorobic/kImageAnnotator https://github.com/DamirPorobic/kColorPicker Cheers, Damir
Thanks! I was able to successfully build after that. Now, I see that ksnip does not obey the official Qt theme, is this by design?
It uses the Qt Fusion Style by default because Fusion is available for all platforms (Winows, MacOS, Linux). If you're not a big fan of Fusion (like me), then you can switch the style under Options -> Settings -> Application -> Application Style. You should see there all available Qt Styles on your machine.
Got it and changed it. Thank you!